
The Heat Detection module is used to track estrus cycles (heat) in female animals.
Accurate heat recording is critical for determining the optimal timing for Artificial Insemination (AI) and maintaining a high pregnancy rate across the herd.
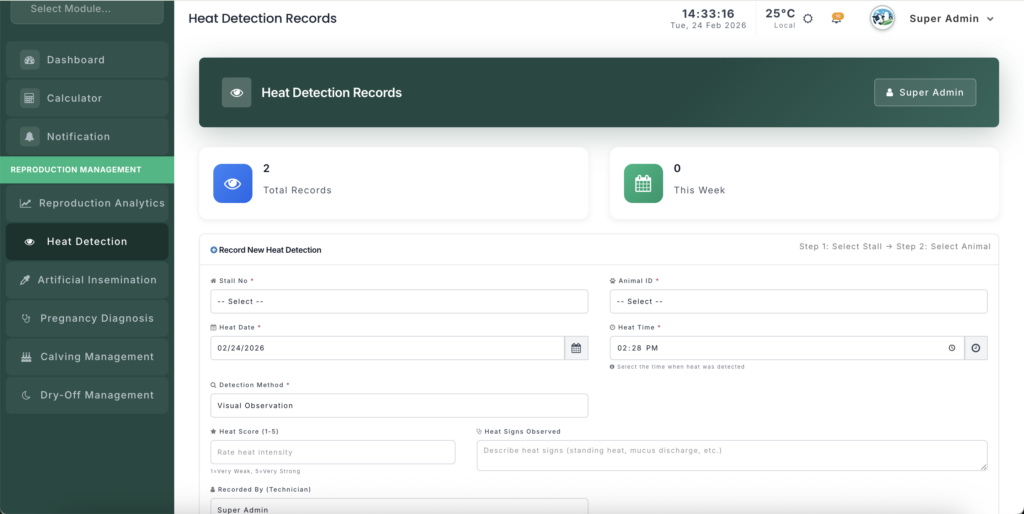
Module URL:http://127.0.0.1:8001/reproduction/heat-records
📋 Feature Overview #
The Heat Detection module allows you to:
📝 Record Heat Cycles #
Log:
- Date
- Time
- Heat intensity
- Observed signs
For cows and heifers eligible for breeding.
👁 Track Detection Methods #
Record how heat was identified:
- Visual observation
- Sensor / Pedometer / Activity Monitor
- Tail Paint marking
This helps evaluate detection accuracy over time.
🔄 Workflow Integration #
- Schedule AI directly from heat entry
- Instantly transition to a live AI session
- Automatically link AI to the corresponding heat report
🧠 Smart Filtering #
The system automatically hides:
- Dead animals
- Animals already confirmed pregnant
This prevents breeding errors.
🚀 How to Manage Heat Records #
1️⃣ Recording a New Heat Detection #
Follow these steps:
Step 1: Stall / Shed Selection #
Select the animal’s location.
This filters the animal list for easier identification.
Step 2: Animal Selection #
Choose the specific animal tag.
Step 3: Date & Time #
Enter the exact observation time.
⏱ Timing is critical — AI success depends heavily on precise heat detection.
Step 4: Detection Method #
Select how heat was identified:
- Visual — Staff observation
- Sensor / Activity Monitor — Automated detection systems
- Tail Paint — Mounting behavior evidence
Step 5: Heat Score (1–5) #
Rate intensity:
- 1 = Very Low Signs
- 2 = Mild
- 3 = Moderate
- 4 = Strong
- 5 = Standing Heat (Peak Fertility)
Higher scores typically indicate a better AI window.
Step 6: Detailed Signs #
Record specific symptoms, such as:
- Standing heat
- Clear mucus discharge
- Mounting behavior
- Restlessness
- Swollen vulva
Detailed observations improve reproductive analytics.
2️⃣ Scheduling AI (Optional) #
If AI timing is already determined:
- Use the AI Schedule section
- Set future date and time
- Add technician instructions
- Example: “Use sexed semen”
- “Second service attempt”
This improves planning and coordination.
3️⃣ Managing the Heat Records List #
The main list displays all recent detections.
🔎 Heat Information #
Shows:
- Animal ID
- Detection timing
- Detection method
- Heat score
💉 AI Status #
Indicates whether:
- AI has been scheduled
- AI has already been performed
🧪 Perform AI Shortcut (Syringe Icon) #
Click the Syringe Icon to:
- Instantly create an AI record
- Auto-fill animal details
- Link AI to this heat detection
- Optimize insemination timing
⚠ Always use this shortcut when possible to ensure proper data linkage.
✏ View / Edit #
- Review full observations
- Correct data entry errors
- Add additional remarks
💡 Best Practices #
⏱ Perform Regular Checks #
For visual detection:
- Observe animals at least 2 times daily
- Ideally 3–4 checks per day
- Record all heat signs — even low intensity
Consistent monitoring reduces missed breeding opportunities.
💉 Always Use the Syringe Shortcut #
Starting AI directly from the heat record:
- Prevents data mismatch
- Improves conception rate analytics
- Ensures accurate reporting in Reproduction Analytics
📊 Prioritize High Heat Scores #
Animals scoring 4 or 5:
- Are usually at peak fertility
- Should be prioritized for high-quality semen
- Provide better conception probability
🗂 Avoid Unnecessary Deletions #
Only delete records if:
- The wrong animal was selected
- Entry was clearly incorrect
Even “false heats” provide valuable reproductive history insights.
📈 Management Insight #
Heat detection accuracy directly affects:
- Conception rate
- Days open
- Calving intervals
- Breeding costs
- Overall farm profitability
Improving heat detection efficiency often yields greater returns than increasing semen investment.


Leave a Reply
You must be logged in to post a comment.