
Table of Contents
The Stock Transaction Management module allows you to track all inventory movements, including items coming in, going out, and adjustments. This ensures your farm resources are always accounted for accurately.
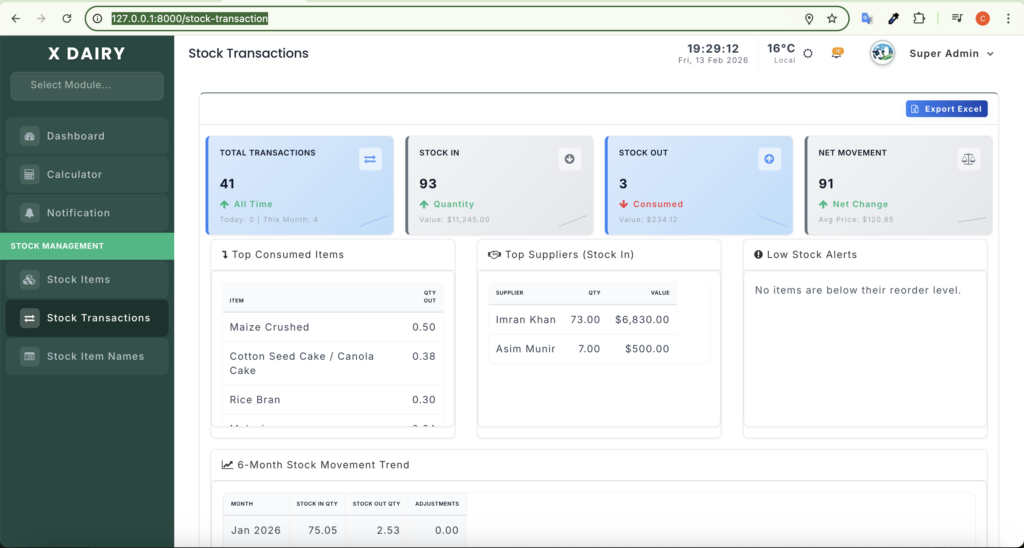
Accessing the Module #
- URL:
http://127.0.0.1:8000/stock-transaction - Requires user login with sufficient permissions (branch manager or inventory staff).
Main Features #
- Record Stock In
- Use this to add new items to inventory.
- Typical scenarios:
- Receiving feed from supplier
- Delivery of medicines
- Equipment purchases
- Record Stock Out
- Use this when items are used on the farm.
- Typical scenarios:
- Feed given to livestock
- Medicines administered to animals
- Tools taken for maintenance
- Adjust Stock
- Correct stock counts for:
- Spoilage
- Theft
- Counting errors
- Always include a reason/note for traceability.
- Correct stock counts for:
- View Transaction History
- See all past transactions.
- Filter by:
- Date Range
- Item Type/Category
- Supplier
- Transaction Type (In/Out/Adjustment)
- Audit and Traceability
- Each transaction can be linked to:
- A supplier
- A farm event (e.g., treatment, feeding)
- Color-coded entries:
- Green → Stock In
- Red → Stock Out
- Blue → Adjustment
- Each transaction can be linked to:
Step-by-Step Instructions #
1. Adding a Stock Transaction #
Stock In:
- Click “Add Transaction”.
- Select Stock Item from the dropdown.
- Choose Transaction Type = In.
- Enter Quantity and Unit Price.
- Add optional Supplier and Invoice #.
- Click Save → Inventory automatically updates.
Stock Out:
- Click “Add Transaction”.
- Select Stock Item.
- Choose Transaction Type = Out.
- Enter Quantity.
- Optional: Add Purpose or Notes (e.g., Feeding, Medical Treatment #).
- Click Save → Inventory decreases accordingly.
Adjustment:
- Click “Add Transaction”.
- Select Stock Item.
- Choose Transaction Type = Adjustment.
- Enter Quantity (+ or – depending on correction).
- Add a Note/Reason.
- Click Save → Stock updated.
2. Viewing Transactions #
- Open the Transaction Ledger.
- Use filters for:
- Date Range
- Item Type
- Supplier
- Transaction Type
- Click on any transaction to view details.
3. Understanding the Dashboard #
- Color Indicators:
- Green = Stock In
- Red = Stock Out
- Blue = Adjustments
- Columns:
- Date
- Item Name
- Transaction Type
- Quantity & Unit
- Linked Record (if any)
- Notes
- Branch
- Quick Actions:
- Edit transaction (if authorized)
- View linked farm event
- Delete (soft delete, retains audit trail)
4. Best Practices #
- Always link transactions to suppliers or events for accurate reporting.
- Enter notes/reasons for stock out and adjustments.
- Verify unit measurements carefully:
- The system will auto-convert bags, kg, liters, or pieces.
- Check inventory levels after each transaction to avoid low-stock surprises.
5. Troubleshooting #
| Issue | Solution |
|---|---|
| Quantity appears incorrect | Check micro-unit conversion (e.g., 5 Bags × 50kg = 250kg) |
| Cannot save transaction | Ensure all required fields are filled: Item, Quantity, Transaction Type |
| Linked record missing | Confirm that the associated farm event or supplier exists |
| Transaction missing from ledger | Check branch filter – transactions are branch-specific |
6. Tips for Users #
- Use the search and filters to quickly locate transactions.
- Keep stock-in and stock-out notes clear for audits.
- Regularly check for low stock alerts to prevent shortages.
- Only authorized users can edit or delete transactions – others can only view.
This guide ensures farm staff, inventory managers, and branch admins can use the Stock Transaction module effectively, maintain accurate stock levels, and provide full traceability for audits.


Leave a Reply
You must be logged in to post a comment.